
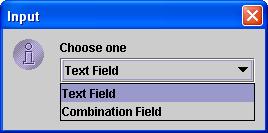
Simple Search is one of the three searching aspects that may be included in a service configuration. Simple search allows for the creation of so-called canned queries. Canned queries are set queries that the end user will always see and not be able to alter themselves. Typically these kinds of queries are common for end users of the particular domain. The queries invlove searching on certain fields within a model and getting back results for fields in the model which may the same or different from those used to search on. Decisions on these should usually be made by a domain expert and communicated to the service designer. The panel for this in the application looks like the figure below.
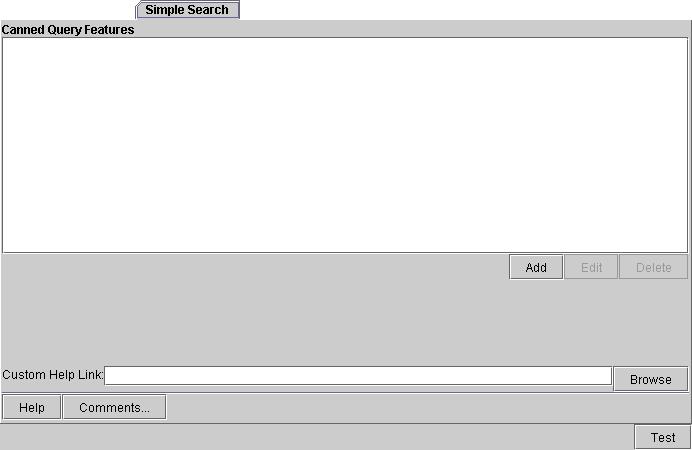
Canned Query Features: Creating canned queries is a multi-step process. There will be a series of pop-up dialogs that you will have to fill in. These will be described in the order in which they appear when creating canned queries.
To add a new canned query, click Add and a dialog window like the one shown below will appear.
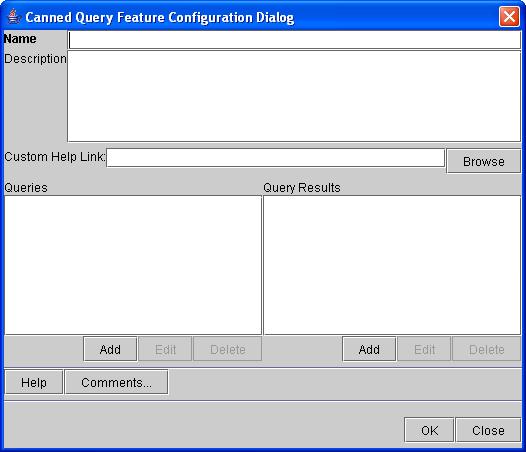
This window will allow you to give a Name and Description for the canned query in the appropriate fields.
The Help and Comments... buttons and the Custom Help Link: field with Browse button function are the same as those on the main tab. See their entries further down for more information. To close the dialog and save your changes, click OK. To close the dialog without saving any changes, click Close.
The Queries list is is the list of fields that you want to query on. Clicking Add will bring up a dialog window as shown below. To remove an existing entry, select the desired one and click Delete.
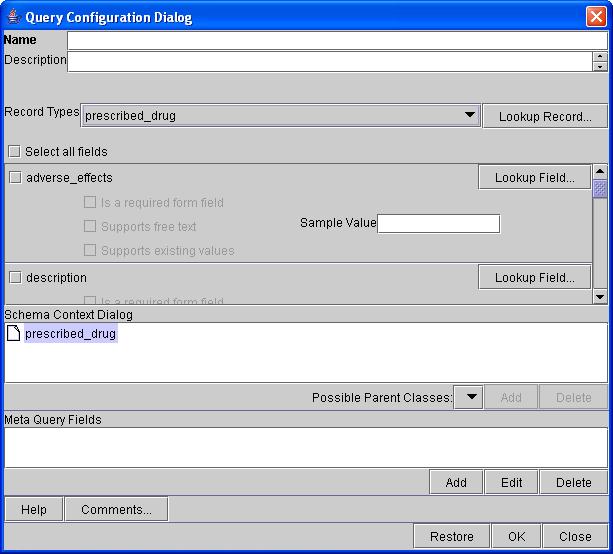
The dialog allows you to give a Name and a Description. The Record Types field is a drop down list of all the record types in the schema being used. The associated Lookup Record... button will display any existing context help for the given record.
Select all fields will highlight all the fields given in the list below it. These fields are those that belong to the record that has been selected from the drop down list. To select only certain fields, tick the desired ones. The background of that field on the dialog will then be highlighted. You will then be able to select conditions for the field when it appears on the front end. These are Is a required form field, Supports free text, or Supports existing values. You can choose more than one of these if you want. There is also a space for Sample Value which will present a sample value to the end user using the front end. The Lookup Field... button will display any context help for the given field.
The Schema Context Dialog shows the context of the selected record in the schema. The drop down list below it called Possible Parent Classes will show what parents exist for the given record. If no values appear in the list then this indicates a flat hierarchy. This feature is really only relevent for XML repositories. Click Add to add a new schema context and a dialog like the one below will appear. To remove an existing schema context, select it and then click Delete.

This dialog allows you to enter a Field Name and choose from a list of possible types: Text, Integer, Float, or Double. For the non-text types, you can also select an Upper Bound and/or a Lower Bound value. To close the dialog and save your changes, click OK. To close the dialog without saving any changes, click Close.
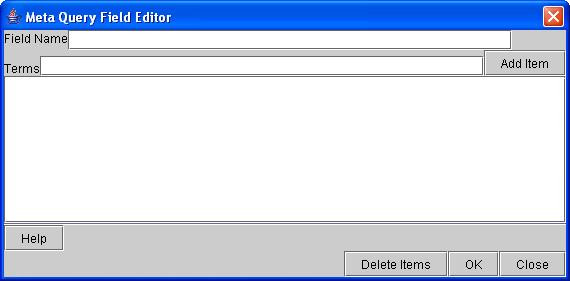
This dialog allows you to enter a Field Name and to give it associated Terms. Clicking the Add Item button then adds each term to the list space below. Clicking the Help button brings up a window with more information on filling out this form. To remove an item from the list, select the desired item and then click Delete Items. To close the dialog and save your changes, click OK. To close the dialog without saving any changes, click Close.
The Help and Comments... buttons the same as those on the main tab. See their entries further down for more information. Restore returns the last saved values for the fields in the dialog. To close the dialog and save your changes, click OK. To close the dialog without saving any changes, click Close.
The Query Results list is is the list of fields that you want to have returned in your report. Clicking Add will bring up a dialog window as shown below. To remove an existing entry, select the desired one and click Delete.

The dialog allows you to give a Name and a Description. The Record Types field is a drop down list of all the records types in the schema being used. The associated Lookup Record... button will display any existing context help for the given record.
Select all fields will highlight all the fields given in the list below it. These fields are those that belong to the record that has been selected from the drop down list. To select only certain fields, tick the desired ones. The background of that field on the dialog will then be highlighted. You will then be able to select the form the results are returned in. These are either text or image. The Lookup Field... button will display any context help for the given field.
The Schema Context Dialog shows the context of the selected record in the schema. The drop down list below it called Possible Parent Classes will show what parents exist for the given record. If no values appear in the list then this indicates a flat hierarchy. This is really only relevent for XML repositories.
The Help and Comments... buttons the same as those on the main tab. See their entries further down for more information. Restore returns the last saved values for the fields in the dialog. To close the dialog and save your changes, click OK. To close the dialog without saving any changes, click Close.
Custom Help Link: This allows you to specify a field that may be used to assist end users when they are using one of the front ends generated. Clicking the Browse button brings up a dialog for searching for existing files. Note that this is not the same kind of help that is given by the Help button below.
Help: Clicking this button brings up a window with help on filling in the given tab. Note that this is not the same kind of help given by the Custom Help Link field above.
Comments...: clicking this button allows you to add specific comments for this tab. A dialog will appear like the one shown below.
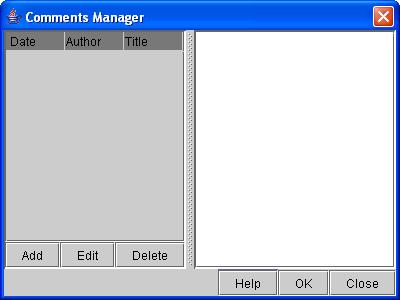
The left hand side will list the comments that have already been added while the right hand side will display the comment that you have selected from the left. To add a new comment, click Add and a second dialog will appear like the one below. Selecting a comment on the left hand side and clicking Edit will allow you to change an existing comment while clicking Delete will remove it from the listClicking Help brings up a window with information about filling in the dialog. To close the dialog and save your changes, click OK. To close the dialog without saving any changes, click Close.
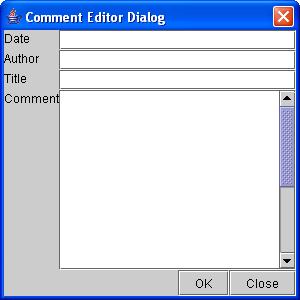
This dialog allows you to enter information for Title, Author, Date, and Comment. To close the dialog and save your changes, click OK. To close the dialog without saving any changes, click Close.
Test: Clicking this button will generate a sample front end application with the current values in the service design. Note that this test front end will look like the standalone application and will not provide you with samples of the other front end deployments.