
This tutorial will lead you through some of the steps involved in configuring a browse and search service for end users. It is expected that service configurers
To start the configuration tool, go to where you have installed Pierre and go into the dist directory, pierre\dist. There, click on the run_configuration_tool MS-DOS Batch File. A dialog will appear asking you to select a model directory. Select the one you will be working on and you should then see the configuration gui appear as below.
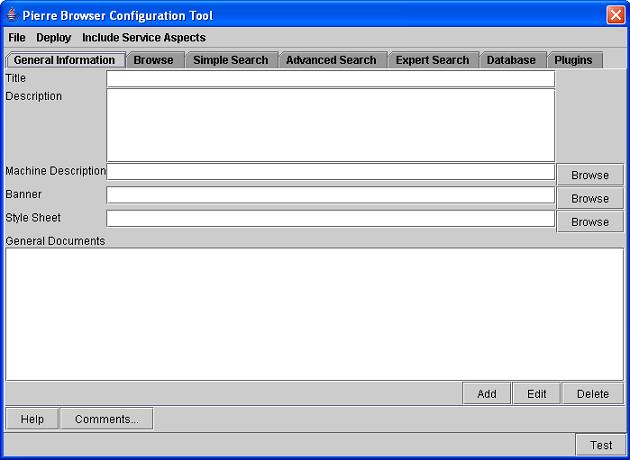
Pierre currently has three menu items to work with: File, Deploy, and Include Service Aspects.

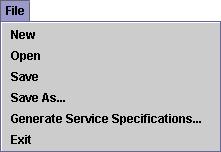
File has a drop down menu as shown below.
| Feature | Description |
|---|---|
| New | causes a new blank Pierre configuration window to appear. |
| Open... | opens an existing service design file. |
| Save | saves any changes you've made to disk. |
| Save As... | saves the service design information you have to disk, in a file with a name you specify. |
| Generate Service Specifications... | creates a functional specification of the service that has been created. This file is saved is saved as a web page in a location you specify. |
| Exit | terminates the program. |
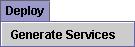
Deploy has a drop down menu as shown below.
| Feature | Description |
|---|---|
| Generate Services | selected after the configuration has been completed, tested, and saved. This will generate an ant build file. The "Deploying to the end users" section below will tell you what should be done next. |
Include Service Aspects has a drop down menu as shown below.
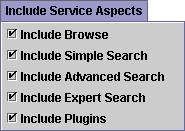
Each of the entries shown corresponds to a panel on the gui that is optional to include in the final configuration. The default is for all to be included. Untick the check box next to any of those that you don't want to include. Note that the panels for General Information and Database are not optional and must be included.
When you are ready to auto generate the front end services, go to the Deploy menu item and select Generate Services A window, as shown below, will appear prompting for information.
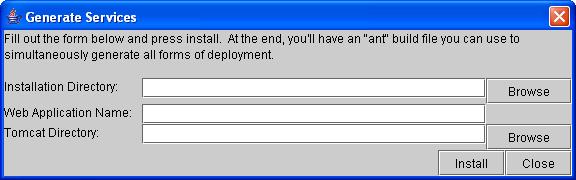
Installation Directory is the directory into which the autogenerated services will be placed. This directory itself is not automatically created and you must do this yourself beforehand. Web Application Name is the name of the folder that is to go in the Tomcat webapps folder for the web front end deployment. Tomcat Directory is simply where you have put Tomcat. Once you have entered all of these, click Install. A message like the one shown below will appear.

On a command prompt, go the the directory where you have installed Pierre and in the same directory where you find the run_configuration_tool.bat file, type ant. This assumes that you have ant installed on your machine - this needs to be done before you deploy anything. After the ant run has finished, the installation directory you specified earlier will now be populated with the autogenerated front end services.
The Standalone and text menu application can be ruun with the created batch files and the command line service has the appropriate information to start using it. The web application will be in a folder with the name you gave it at the time of deployment. This folder must be copied or moved over to the webapps directory in Tomcat in order to be used.